
If you often wander on Smartphone websites or forums, you've probably seen topics related to rooting devices, especially Android devices. If you are wondering why rooting or how to root your Android device. Invite you to refer to the following article:
After rooting your Android device, you have full system access and can run many types of applications that require root access. These applications can disable bloatware, control allowed applications, activate connections and many other great things.
Overview of Android root
1. What is root?
2. Why root your Android device?
3. Android root method
4. Some notes before rooting Android phones
5. How to root Android phone with SuperSU
6. Use KingRoot to root any Android phone

1. What is root?
Root has many interpretations depending on the device and case. When using Android root, here is root unlocking an Android device to allow more access to the core software that might have been blocked by the device manufacturer.
Android is developed on Linux platform. For Linux and other UNIX operating systems, the root user is equivalent to the Administrator user on Windows. Root users have access to the entire file system in the operating system and do whatever they want. By default, users will not have administrative rights on Android devices and certain applications will not work without administrative rights. Some settings, deep intervention into the system will also need to root the device to be able to perform. In other words, Root Android is a way for you to gain administrative rights on your Android device, from which you can perform advanced tweaks or deeply intervene in the file system.
With admin rights, you can disable bloatware (software that is pre-installed on the phone) in the phone, do not allow apps to be manually, run a firewall, access the entire file system. system or device connection, even if the connection feature is disabled. Many applications in the Google Play store (formerly Android Market) require administrative rights and will not be available until you root the device.
Root device is not required. We only need to root the device if we want to do things that require administrative rights on the user.
2. Why root your Android device?
Here are some reasons why you should root your Android device:
- Install Custom ROM:
After your Android device has been rooted, you can Flash a Custom ROM or Kernel, which means you will be able to experience and use your Android phone exactly as you just bought it.
- Uninstall Preinstalled Crapware:
Manufacturers do not allow users to uninstall Preinstalled applications on their devices. However, when rooting these devices, users can uninstall the settings easily.
- Block ads (Ads) on any one application:
Every time you play a game, ... on the screen displays an ad popup and this makes you feel extremely uncomfortable. However, if a device has been rooted, all these ads will be "removed" and no longer annoy you.
- Install incompatible applications:
Some applications that require root access can be installed on your device. So if your device is rooted, you are free to install these apps.
- Speed up Android booting process and extend battery life:
Some apps like Greenify may automatically close unused applications on your Android device to improve your device performance. And of course, Greenify needs root access.
- Update to the latest version of Android:
Operating system updates are always a headache for Android users. By rooting your device, you can always download and install the latest operating system (optimized for each model) at any time before it is officially available.
3. Android root method
There are many ways to root an Android phone and the way you use it depends on your phone. Generally root involves one of the following processes:

- Unlock Bootloader: Google and device manufacturers don't officially support rooting, but they provide an official way to get low-level access to some devices, then allow you to root. For example, Nexus devices are for developers and you can easily unlock the bootloader with a single command. You can then root the device by flashing the zip file containing the SU binary from the recovery screen. Other manufacturers also offer ways to unlock the bootloader, but only for specific devices.
- Exploiting security holes: Some manufacturers do not provide an official way to unlock the bootloader and change their software. However, you can still root these devices by exploiting security holes on the device to install SU binaries into the system partition. OTA updates can fix security holes and unroot devices. For example, there is a $ 18,000 bonus for the first person to root a Samsung Galaxy S5 device running on Verizon or AT&T. And a flaw has been found, but future updates may prevent this from working and remove the ability to root Galaxy S5.
- Flash CyanogenMod or custom ROM: Technically, this is an extension of the above two methods. Unlocking the bootloader and exploiting security vulnerabilities can allow you to flash custom ROMs like CyanogenMod, which is usually rooted. CyanogenMod has a simple switch on its settings screen that allows you to enable or disable root access. Upgrading to a new version of CyanogenMod or custom ROM will not destroy your device root if the ROM comes with an integrated way to activate root.
4. Some notes before rooting Android phones
Before rooting your Android phone or tablet, there are a few things users should be aware of:
- Warranty: Many manufacturers claim that rooting invalidates the device warranty. However, rooting Android does not actually harm the hardware. The user can "unroot" the device and the manufacturer will not be able to know if the device has been rooted.
- Security: In particular, Google Wallet has a flaw on rooted devices that could allow other apps to access a user's PIN and other personal information. Google Wallet will display a warning message if the user is using the program on a rooted device. If you are one of those people who use Google Wallet to pay on NFC, you may want to reconsider rooting your device.
- "Brick" phenomenon: Rooting a device is a safe process. However, there is always some risk of harm to the device if the user changes the normal parameters and performs hacking on the device. In particular, if the user is trying to root a device or an operating system version not supported by a tool. "Bricking" is damaging the device, making it no different from the function of a brick. When rooting, jailbreaking or installing a custom ROM, or hacking around, there are always certain risks. It would be better to do a bit of research and find out if anyone else announced that they had successfully rooted the device like them.
5. How to root Android phone with SuperSU
Before starting this process, you will need to unlock the bootloader in the official way and then install the TWRP Recovery environment, then use TWRP to root the phone.
Next to gain root access, we will use a program called SuperSU, which provides access to other applications. Although you can download SuperSU from the Google Play Store, that version doesn't really provide root access. Fortunately, SuperSU has a .zip file that you can flash TWRP from, which has root access along with SuperSU's Android app management features.To get started, visit the link below to download the latest version of SuperSU as a .zip file to your computer. Then plug your phone into the computer with a USB cable and pull the SuperSU zip file into the phone's internal memory or SD card.
http://forum.xda-developers.com/showthread.php?t=1538053
Next, boot the phone into TWRP recovery. How to access this mode varies depending on the phone. For example, you need to press the power button and volume down button at the same time, then use the volume key to boot into Recovery Mode.
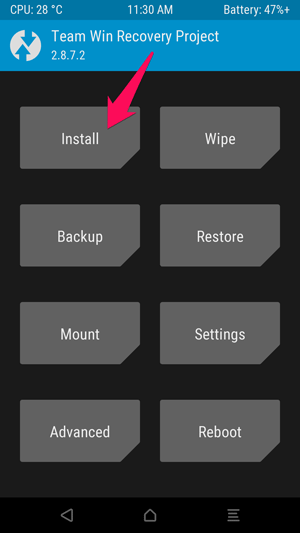
Once in this mode, you will see the familiar TWRP main screen, click the Install button.
Note: You should perform backups in TWRP before proceeding.
You should see the screen shown below, scroll down and navigate to the SuperSU ZIP file you transferred earlier.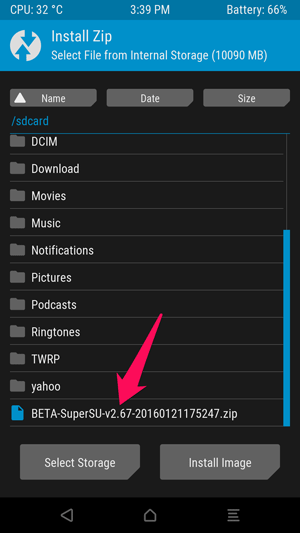
Tap on SuperSU zip and you will see this screen, swipe to confirm the flash.
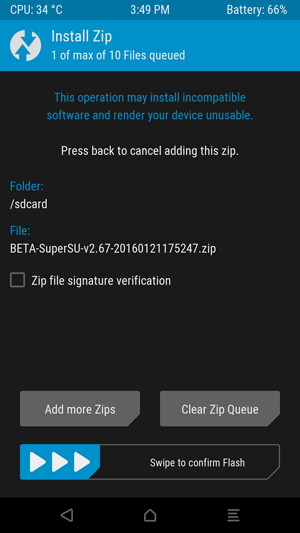
Flashing this SuperSU package takes only a few minutes. Once finished, tap the Wipe cache / Dalvik button that appears and swipe to confirm.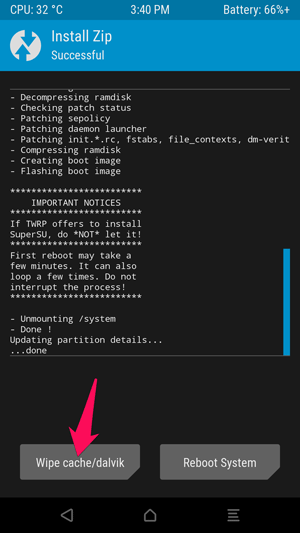
When finished, tap the Reboot System button to reboot into Android.
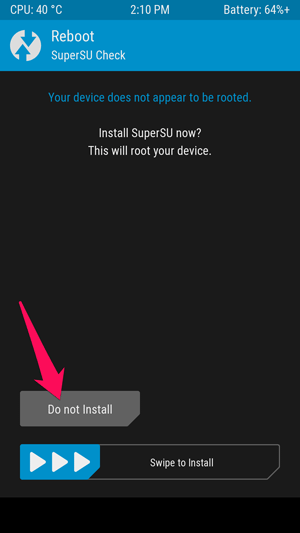
If TWRP asks if you want to install SuperSU right now, choose Do Not Install. Sometimes, TWRP cannot detect that you already have SuperSU on the device, so it will require flashing its built-in version. But it's best to flash the latest version of SuperSU yourself as you have done.
Manage root privileges with the SuperSU app
When you restart your phone, you'll see a new SuperSU icon in your app drawer. SuperSU controls other applications on your phone that have root access. Whenever an application wants to request root access, it must ask the SuperSU application, which will display a request prompt.
To make sure the root is working properly, you can download the Root Checker app and verify the rooted state. Or download an app for root only that you want to try and see if it requires root permission.
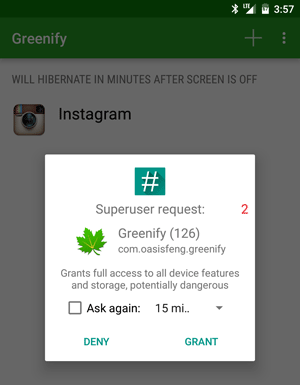
For example, if you open the Greenify app, a handy Android battery-saving app for rooted phones, you'll see a message like the one below that requires root access. If you click on Grant and receive the success message, this means you have successfully rooted the phone.
To manage root permissions, open the app drawer and click on the SuperSU icon. You will see a list of applications that have been granted or denied root access. Touch an application to change its permissions. If you want to unroot, open the SuperSU application, go to its Settings screen and click the Full unroot option.
6. Use KingRoot to root any Android phone
Requirements: Your Android device must have at least 20% or more battery life to not be interrupted during the rooting process.
Steps to follow:
Step 1:
On your Android device, open Settings => Security => Device Administration => tick Unknown Source to activate.
Step 2:
Download and install the KingRooot APK on your Android device.
https://androidmtk.com/download-kingroot-application
Step 3:
After completing the installation process, you will see the application icon on the Launcher Menu.

Step 4:
Click the KingRoot icon to open the application.

Step 5:
Next, click the Start Root button to start the rooting process.

Step 6:
Now KingRoot will begin the process of rooting your Android device.

Step 7:
Wait until the screen of your Android device appears a large blue trace as shown below, which means that your device has been successfully rooted.

Step 8:
Restarting your Android device is done.
Source: https://totaldrivers.net/tips/tips-step-by-step/item/746-easy-and-fast-android-rooting-guide
No comments:
Post a Comment